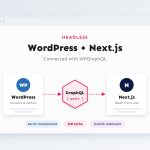
WordPress is one of the best content editors on the web. Next.js is one of the best ways to build fast, modern frontends with React. “Headless WordPress” combines them: editors keep the WordPress admin they know, and visitors get a frontend built with Next.js that pulls content from WordPress through an API.
It is a powerful setup, but it is also frequently chosen for the wrong reasons. In this guide I explain how the architecture works, connect WordPress to a Next.js App Router project with WPGraphQL step by step, cover caching and on-demand revalidation so published changes appear quickly, and finish with an honest look at when headless is worth the extra complexity and when a traditional WordPress theme is the better choice.
In this article
What “headless WordPress” actually means
In a traditional WordPress site, one application does everything: it stores content, runs PHP theme templates, and sends finished HTML to the browser. The “head” is the theme, the part visitors see.
In a headless setup, you remove that head. WordPress becomes a content backend that exposes data through an API, either the built-in REST API or WPGraphQL, and a separate application renders the website. That frontend can be Next.js, a mobile app or any other client, all reading from the same content.
The architecture at a glance
Here is the setup I use for headless WordPress with the Next.js App Router. Editors work in WordPress exactly as before. Next.js requests content from the WPGraphQL endpoint on the server, renders pages with React Server Components, and caches the result so most visitors get a page from the CDN without WordPress being involved at all. When an editor publishes, WordPress calls a webhook that tells Next.js to refresh the affected pages.
Step 1: Set up WPGraphQL
WordPress has a REST API built in, and it works fine for headless projects. I prefer WPGraphQL because it lets the frontend ask for exactly the fields a page needs in a single request, including related data such as the author, categories and featured image, instead of making several REST calls and receiving fields it does not use.
- Install and activate the free WPGraphQL plugin from the WordPress plugin directory. It adds a
/graphqlendpoint. - Open GraphQL → GraphiQL IDE in the admin to explore the schema and test queries with autocomplete.
- Custom post types and taxonomies appear in the schema when they are registered with
show_in_graphql, agraphql_single_nameand agraphql_plural_name. Popular plugins such as Advanced Custom Fields and Yoast SEO have WPGraphQL extensions. - Use pretty permalinks, and decide where the frontend will live, for example WordPress on
cms.example.comand Next.js onexample.com.
A query for the latest posts looks like this. You describe the shape of the data you want, and the response comes back in exactly that shape:
query LatestPosts($first: Int = 10) {
  posts(first: $first, where: { orderby: { field: DATE, order: DESC } }) {
    nodes {
      slug
      title
      date
      excerpt
      featuredImage {
        node {
          sourceUrl
          altText
        }
      }
      categories {
        nodes { name slug }
      }
    }
    pageInfo {
      hasNextPage
      endCursor
    }
  }
}
Exposing custom post types
Most real projects have more than posts and pages: projects, services, team members, case studies. To make a custom post type queryable, add three arguments when you register it. WPGraphQL then generates project and projects fields with the same filtering and pagination as posts.
<?php
add_action( 'init', function () {
	register_post_type( 'project', array(
		'label'               => 'Projects',
		'public'              => true,
		'show_in_rest'        => true, // Block editor support.
		'supports'            => array( 'title', 'editor', 'excerpt', 'thumbnail' ),
		'show_in_graphql'     => true,
		'graphql_single_name' => 'project',
		'graphql_plural_name' => 'projects',
	) );
} );
Keep in mind that everything public in WordPress is public in the API too. Only expose the post types and fields the frontend actually needs, and keep drafts and private data behind authentication.
Step 2: Fetch data in Next.js
In the App Router, Server Components can fetch data directly, so the API call happens on the server and the GraphQL endpoint is never exposed to the browser. A small helper keeps every request consistent. I send queries as GET requests, which WPGraphQL supports, because GET responses can be cached by Next.js and by a CDN in front of WordPress.
// lib/wordpress.ts
const API_URL = process.env.WORDPRESS_GRAPHQL_URL!; // e.g. https://cms.example.com/graphql

type GraphQLResponse<T> = { data?: T; errors?: { message: string }[] };

export async function wpQuery<T>(
  query: string,
  variables: Record<string, unknown> = {},
  tags: string[] = ['wordpress'],
): Promise<T> {
  const url = new URL(API_URL);
  url.searchParams.set('query', query);
  url.searchParams.set('variables', JSON.stringify(variables));

  const res = await fetch(url, {
    headers: { Accept: 'application/json' },
    // Cache the response, refresh it at most once an hour,
    // and tag it so a webhook can refresh it on demand.
    next: { revalidate: 3600, tags },
  });

  if (!res.ok) {
    throw new Error(`WPGraphQL request failed: ${res.status}`);
  }

  const json = (await res.json()) as GraphQLResponse<T>;
  if (json.errors?.length) {
    throw new Error(json.errors.map((e) => e.message).join('\n'));
  }
  return json.data as T;
}
Step 3: Build the post page
A dynamic route at app/blog/[slug]/page.tsx renders each post. generateStaticParams pre-renders known posts at build time, generateMetadata sets the title and description, and the page component renders the content. In recent versions of Next.js (15 and later), params is a Promise, so it must be awaited.
// app/blog/[slug]/page.tsx
import type { Metadata } from 'next';
import { notFound } from 'next/navigation';
import { wpQuery } from '@/lib/wordpress';

type Post = {
  title: string;
  content: string;
  date: string;
  excerpt: string;
};

type Props = { params: Promise<{ slug: string }> };

const POST_QUERY = `
  query PostBySlug($slug: ID!) {
    post(id: $slug, idType: SLUG) {
      title
      content
      date
      excerpt
    }
  }
`;

async function getPost(slug: string) {
  const data = await wpQuery<{ post: Post | null }>(POST_QUERY, { slug }, [
    'posts',
    `post:${slug}`,
  ]);
  return data.post;
}

// Pre-render the most recent posts at build time; others render on first visit.
export async function generateStaticParams() {
  const data = await wpQuery<{ posts: { nodes: { slug: string }[] } }>(
    `query { posts(first: 50) { nodes { slug } } }`,
  );
  return data.posts.nodes.map(({ slug }) => ({ slug }));
}

export async function generateMetadata({ params }: Props): Promise<Metadata> {
  const { slug } = await params;
  const post = await getPost(slug);
  if (!post) return {};
  return {
    title: post.title,
    description: post.excerpt.replace(/<[^>]+>/g, '').trim(),
  };
}

export default async function PostPage({ params }: Props) {
  const { slug } = await params;
  const post = await getPost(slug);
  if (!post) notFound();

  return (
    <article>
      <h1 dangerouslySetInnerHTML={{ __html: post.title }} />
      <time dateTime={post.date}>
        {new Date(post.date).toLocaleDateString('en-GB', { dateStyle: 'long' })}
      </time>
      <div dangerouslySetInnerHTML={{ __html: post.content }} />
    </article>
  );
}
Calling getPost in both generateMetadata and the page is fine: Next.js memoises identical fetch calls within a single render, so WordPress receives one request. Rendering content as HTML is acceptable here because it comes from your own editors, and WordPress already filters the HTML that users without the unfiltered_html capability can save.
Rendering strategies and caching
The biggest advantage of headless is control over when HTML is produced. Next.js gives you several options, and you can mix them per route:
| Strategy | When HTML is built | Freshness | Best for |
|---|---|---|---|
| Static (SSG) | At build time | Until the next deploy | Pages that rarely change |
| Incremental (ISR) | At build or first visit, then refreshed in the background | Within the revalidate window, or instantly with on-demand revalidation | Blogs, marketing pages, catalogues |
| Dynamic (SSR) | On every request | Always current | Personalised pages, search results |
| Client-side | In the browser after load | Always current | Dashboards, user-specific widgets |
For WordPress content, incremental static regeneration is usually the sweet spot. Pages are as fast as static files, WordPress is only contacted when a page needs refreshing, and content stays reasonably fresh. Here is how the revalidate: 3600 setting from the helper behaves over time:
Waiting up to an hour for a correction to appear is not acceptable for most editors, which is why the next step matters. Note that Next.js 16 also introduced Cache Components with the "use cache" directive as a newer caching model; the fetch-based approach shown here continues to work and is the easiest to reason about when you are starting out.
Step 4: On-demand revalidation when you publish
On-demand revalidation lets WordPress tell Next.js exactly what changed. First, a route handler in Next.js that checks a shared secret and invalidates the right cache tags and paths:
// app/api/revalidate/route.ts
import { revalidatePath, revalidateTag } from 'next/cache';
import type { NextRequest } from 'next/server';

export async function POST(request: NextRequest) {
  if (request.headers.get('x-revalidate-secret') !== process.env.REVALIDATE_SECRET) {
    return Response.json({ message: 'Invalid secret' }, { status: 401 });
  }

  const { slug } = (await request.json()) as { slug?: string };

  // Next.js 16 takes a cache profile as the second argument.
  // On Next.js 15, call revalidateTag('posts') with one argument.
  revalidateTag('posts', 'max');
  if (slug) {
    revalidateTag(`post:${slug}`, 'max');
    revalidatePath(`/blog/${slug}`);
  }
  revalidatePath('/blog');

  return Response.json({ revalidated: true, now: Date.now() });
}
Then, a few lines in a small plugin or must-use plugin on the WordPress side call that endpoint whenever a post is published, updated or unpublished. The transition_post_status hook fires on every save, including updates to posts that are already published:
<?php
// wp-content/mu-plugins/headless-revalidate.php
// Define FRONTEND_URL and REVALIDATE_SECRET in wp-config.php.
add_action( 'transition_post_status', function ( $new_status, $old_status, $post ) {
	if ( 'post' !== $post->post_type ) {
		return;
	}
	if ( 'publish' !== $new_status && 'publish' !== $old_status ) {
		return; // Drafts and private changes do not affect the public site.
	}

	wp_remote_post(
		FRONTEND_URL . '/api/revalidate',
		array(
			'headers'  => array(
				'Content-Type'        => 'application/json',
				'x-revalidate-secret' => REVALIDATE_SECRET,
			),
			'body'     => wp_json_encode( array( 'slug' => $post->post_name ) ),
			'timeout'  => 5,
			'blocking' => false, // Do not slow down the editor.
		)
	);
}, 10, 3 );
If hooks are new to you, my guide on WordPress actions vs filters explains how add_action works. For larger projects I package this kind of logic as a proper plugin, as described in how to build a custom WordPress plugin the right way.
SEO, previews and images
Several things WordPress does for you automatically become your responsibility in a headless build. Plan for them from the start:
- SEO metadata. Titles, descriptions, canonical URLs, Open Graph tags and schema need to be generated in Next.js. With Yoast SEO and its WPGraphQL extension, you can query the values editors set and pass them to
generateMetadata. You also need a sitemap (app/sitemap.ts) androbots.txton the frontend domain. - Previews. The “Preview” button in WordPress points to the WordPress URL by default. To preview drafts on the frontend, you need authenticated GraphQL requests and Next.js Draft Mode. Frameworks such as Faust.js, built specifically for headless WordPress, handle much of this for you.
- Images. Add the WordPress domain to
images.remotePatternsinnext.configto usenext/imagefor featured images. Images inside post content arrive as HTML and are not optimised automatically unless you parse and transform them. - Internal links and redirects. Links in content point to the WordPress domain unless you rewrite them, and redirects created in WordPress need to be mirrored on the frontend.
- Block styles. Core block markup expects WordPress’s block CSS. Import it into your frontend or write your own styles for the blocks your editors use.
Deploying the two halves
The frontend and backend deploy independently. Next.js runs on any Node.js host or a platform such as Vercel, while WordPress stays on regular PHP hosting. Because visitors never hit WordPress directly, the WordPress server mostly handles editors and cache refreshes, and you can lock it down further: restrict the admin by IP, disable the WordPress frontend with a redirect to the main domain, and set WORDPRESS_GRAPHQL_URL and REVALIDATE_SECRET as environment variables rather than committing them. Set up uptime monitoring for both, because a broken API means new content stops appearing even though cached pages keep working.
When headless is not worth it
Headless is not automatically faster or better. A well-built traditional WordPress theme with good hosting and full-page caching is very fast too; see my Core Web Vitals checklist. Before choosing headless, weigh the real costs:
- Two applications to host, deploy, secure and monitor, often with two hosting bills.
- Plugins that output frontend features stop working on the frontend: form builders, sliders, page builders, membership and many WooCommerce extensions. Each needs an API-based replacement or custom work.
- Editors lose some WYSIWYG comfort: theme previews, the Site Editor and visual page builders do not apply to the Next.js frontend.
- Higher development and maintenance cost, because previews, SEO, forms, search and redirects all have to be built.
| Headless is a good fit when… | A traditional theme is better when… |
|---|---|
| The frontend is highly interactive, app-like or built by a React team | It is a brochure site, blog or typical business website |
| The same content feeds a website, a mobile app and other channels | The site relies on plugins for forms, bookings, memberships or a store |
| You need a frontend that scales independently of WordPress traffic | Editors want visual page building and full-site editing |
| There is budget and a team to maintain two codebases | One developer or a small budget will maintain it long term |
In my own project connecting WordPress and Next.js with WPGraphQL, the clean separation between content and presentation was the big win: the frontend could evolve independently while editors continued to work in WordPress. For many business websites, though, a fast custom theme delivers most of the same benefits with half the moving parts.
Key takeaways
- Headless WordPress keeps the familiar editor and moves rendering to a separate frontend such as Next.js.
- WPGraphQL lets each page request exactly the data it needs in one query.
- Fetch on the server with Server Components, cache with
revalidateand tags, and remember thatparamsis a Promise in recent Next.js. - Use a publish webhook and
revalidateTag/revalidatePathso changes appear right away. - Budget for SEO, previews, images, forms and two deployments, or choose a traditional theme if those costs outweigh the benefits.
Considering a headless build, or not sure whether your project needs one? Get in touch and I will help you choose the architecture that fits your content, team and budget.